Device Bootstrap - Certificate Vending Machine
Certificate Vending Machine is a device registration pattern applied when devices don’t have unique certificates during manufacturing and share the same firmware. Using a Certificate Vending Machine API endpoint (CVM, in short) devices are registered by logic on the cloud with the device’s claim of a unique identifier and a calculated hash with it. This unique identifier can be any serial number, MAC address, or IMEI. This exposed public API points to a cloud application that validates the incoming request and performs required operations to generate and attach certificates to the device.
This implementation focuses on the use of an AWS Lambda + Amazon DynamoDB + Amazon API Gateway combination to validate, register, and keep track of the devices and device registration process. The device invokes the API when it first connects to the internet. Then, AWS Lambda checks the identity and validity of the certificate request with the help of data stored about the device in DynamoDB. There are many device provisioning and registration options available for different types of manufacturing and distribution circumstances. Check device bootstrap section of IoT Atlas to explore other device provisioning and registration methods.
Another method can be bootstrapping the device with a trusted user when devices don’t have unique certificates and a trusted user is available with a mobile app that can relay the certificates to the device.
Use-Cases
Certificate Vending Machine approach for device registration can be a preferred method under the following conditions:
- Devices don’t have unique certificates during manufacturing and share the same firmware.
- Devices can state a unique identifier such as serial number, product ID, IMEI, or Mac ID.
- The manufacturing supply chain is not trusted or 3rd party stakeholders are involved in the device’s life cycle.
- Fine-grained validations or 3rd party service calls are needed to be run during the registration.
- The IoT device needs to interact with an authenticated secure API endpoint to perform its registration.
Reference Architecture
The architecture of the CVM system is as follows:
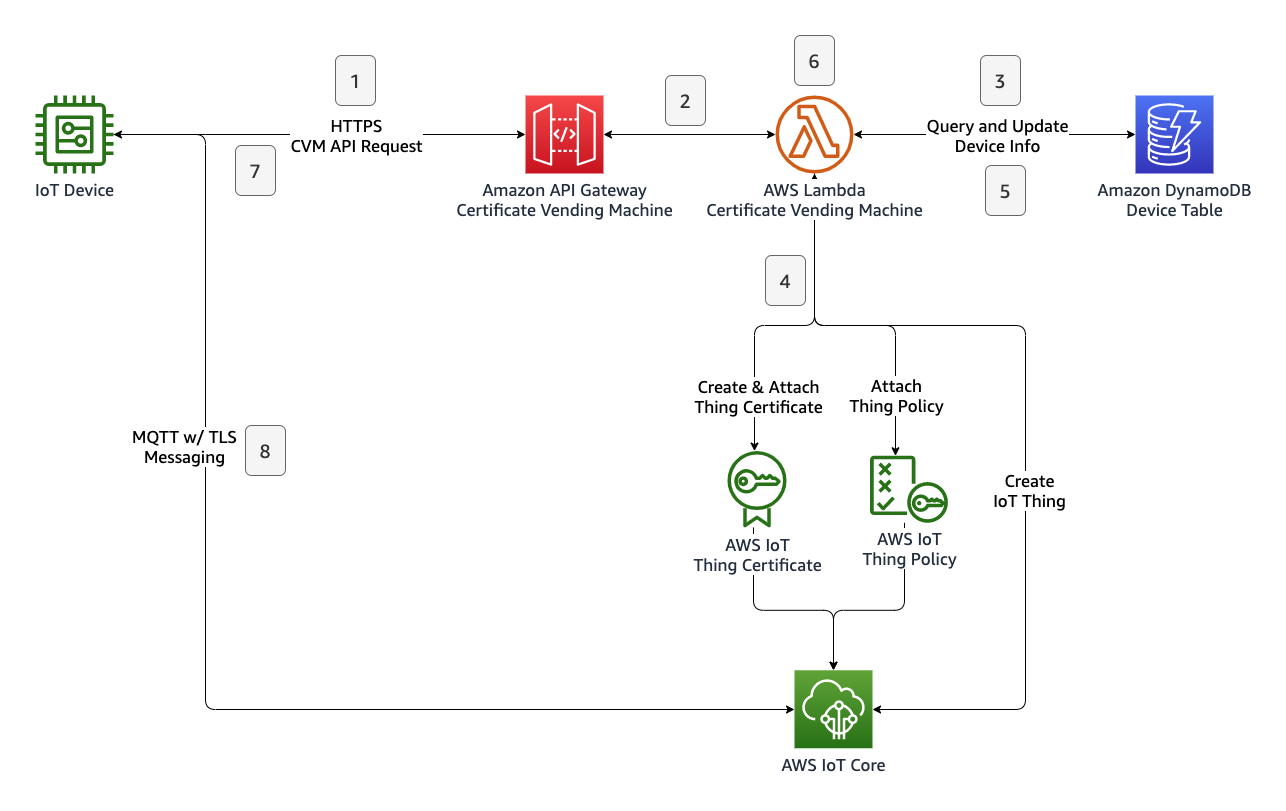
The following steps are involved during registration of an IoT thing with certificate vending machine method:
- Device sends a registration request with a payload containing the device’s unique identifier and registration token to the Amazon API Gateway endpoint.
- Amazon API Gateway service checks the request and invokes the CVM Lambda function.
- CVM Lambda function verifies the registration request by querying the Amazon DynamoDB table.
- CVM Lambda function applies the registration process by creating an IoT thing certificate, attaching the predefined IoT policy to the certificate, creating an IoT thing, and attaching the certificate to the IoT thing.
- CVM Lambda function updates device state info in the corresponding DynamoDB record.
- CVM Lambda function prepares a JSON response payload that includes both unique certificates and AWS IoT Core endpoint information.
- Device receives the certificates and IoT Core endpoint information. Completing the registration process.
- Device initiates a new MQTT w/ TLS connection with its own certificates and parameters gathered from the CVM API response.
The basic representation of this flow is shown as follows:
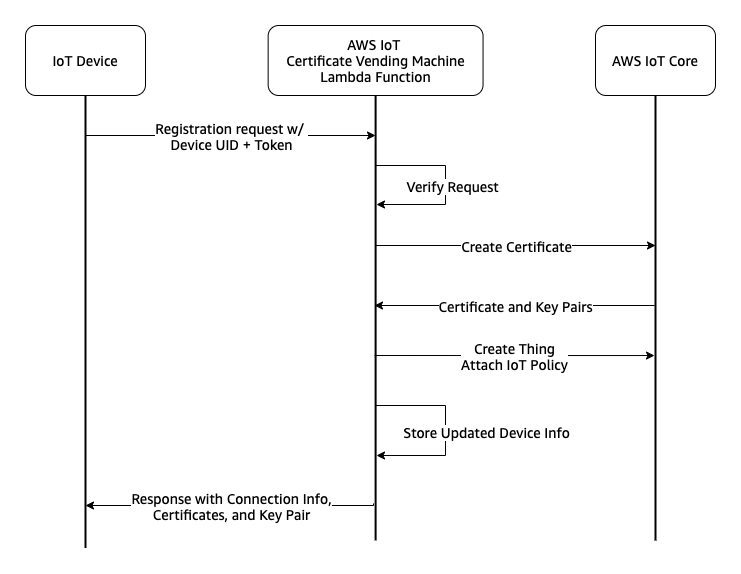
Authentication
Devices will use the public API endpoint to trigger their registration process. This request will contain the device’s unique identifier and registration token. The unique identifier will be used to build the thing’s name. The registration token is a calculated hash value to be stored in the DynamoDB table. The token will be calculated by the device using the same hashing algorithm during the preparation of the CVM API request. When the CVM Lambda receives a registration request, it validates the registration token provided by the device by comparing it with the one calculated previously and stored in the DynamoDB table. Since all devices share the same firmware, this token can be calculated by a combination of a “salt” and the device’s unique identifier. This salt is a secret string that makes SHA256() less predictable by making the input string longer. This secret salt string will be placed into your firmware. Since the salt string is a sensitive piece of data for device bootstrapping, the solution must consider the security of how the salt string is stored. Read more on Considerations section below.
We can summarise the process as follows:
- Device manufacturer inserts a record to the DynamoDB table as:
device_uid=DEVICE001, device_token=SHA256("YOUR_SECRET_SALT//DEVICE001")You can calculate this SHA256 hash with your favorite programming language or using online SHA256 calculators. - Device manufacturer places the salt string into the firmware for hashing.
- During runtime, firmware combines the salt string and the device’s unique identifier to calculate the hash.
- Then, the device sends a request with its unique identifier and calculated registration token to initiate the registration process.
- Device will receive an HTTP response to the request. The response contains the thing name which will be used as client ID, certificates, and AWS IoT Core MQTT endpoint. Device should save this information in a non-volatile location.
Implementation
This section provides implementation guidance for the architecture shown above. You need to have AWS CLI installed on your workstation.
1. Create an IoT Policy
You can assign one generic template to each device provisioned by certificate vending machine. You can take advantage of using policy variables to make your device policy parametrized and to define dynamic permission statements. Following reference policy can be used as an example to restrict each device to its own topic with the help of the “thing name” variable.
Save the following file as iot-policy.json.
{
  "Version": "2012-10-17",
  "Statement": [
    {
      "Effect": "Allow",
      "Action": [
        "iot:Connect"
      ],
      "Resource": [
        "*"
      ],
      "Condition": {
        "Bool": {
          "iot:Connection.Thing.IsAttached": [
            "true"
          ]
        }
      }
    },
    {
      "Effect": "Allow",
      "Action": [
        "iot:Subscribe"
      ],
      "Resource": [
        "arn:aws:iot:*:*:topicfilter/comm/${iot:Connection.Thing.ThingName}"
      ]
    },
    {
      "Effect": "Allow",
      "Action": [
        "iot:Receive",
        "iot:Publish"
      ],
      "Resource": [
        "arn:aws:iot:*:*:topic/comm/${iot:Connection.Thing.ThingName}"
      ]
    }
  ]
}
Run following command to create `iot-policy.json` as an IoT Policy named `SingleDevicePolicy`.

```bash
aws iot create-policy \
    --policy-name SingleDevicePolicy \
    --policy-document file://iot-policy.json
2. Create the DynamoDB table to store device information.
Amazon DynamoDB stores the necessary device provisioning info before the registration process begins and after the registration process completes. In this implementation, following JSON schema is designed to store device information. You can extend the schema with your requirements and application logic.
| Attribute Name | Type | Description |
|---|---|---|
| device_uid | String, Partition Key | Device’s unique identifier |
| device_token | String | Device’s calculated hash |
| is_enabled | Number | Allow/deny device to register. Values: 0 - 1. |
| is_registered | Number | Device’s registration status. This value is written as 1 after the registration. Values: 0 - 1. |
| iot_core_thing_name | String | Device’s thing name registered in IoT Core service. Available only after registration. |
| iot_core_registered_on | String | Device’s registration time stamp in IoT Core service. Available only after registration. |
Navigate to the Amazon DynamoDB console to create a table. Give the table name as DeviceProvisioningInfoDB, configure the partition key field device_uid as String, leave the sort key blank. DynamoDB records in a table are accessed using a combination of partition and sort keys. With this configuration, the CVM Lambda function can access the device’s information using the device’s unique identifier. As another option, you can run the following command to create the DynamoDB table in your default region.
aws dynamodb create-table \
    --table-name DeviceProvisioningInfoDB \
    --attribute-definitions AttributeName=device_uid,AttributeType=S \
    --key-schema AttributeName=device_uid,KeyType=HASH \
    --provisioned-throughput ReadCapacityUnits=5,WriteCapacityUnits=5
3. Deploy a Lambda Function which performs the registration logic.
AWS Lambda runs the application logic that performs the registration and provisioning of the device in the cloud. The function interacts with Amazon DynamoDB and AWS IoT Core services to perform validations and to create the device’s identity in the IoT Core service. Finally, the AWS Lambda function prepares a response in JSON format that is returned to the device through the API Gateway.
You can use following the implementation as the CVM Lambda function. Navigate Amazon Lambda console and create a new python3.9 Lambda function.
import json
import os
from datetime import datetime
import boto3
from botocore.exceptions import ClientError
import urllib.request

def lambda_handler(event, context):
    dynamodb_client = boto3.resource('dynamodb', region_name=os.environ['region'])
    iot_client = boto3.client('iot', region_name=os.environ['region'])

    try:
        device_uid = event['device_uid']
        device_token = event['device_token']
    except Exception:
        return prepare_result(event, "ERROR", 500, {"message": "Missing input data"})

    print("Device registration request for {}".format(device_uid))

    dynamodb_table = dynamodb_client.Table(os.environ['device_dynamodb_table'])

    try:
        device_info = dynamodb_table.query(
            KeyConditionExpression="device_uid = :a",
            ExpressionAttributeValues={
                ":a": device_uid
            }
        )
    except ClientError:
        return prepare_result(event, "ERROR", 500, {"message": "Device database access error"})

    if len(device_info['Items']) <= 0:
        return prepare_result(event, "ERROR", 404, {"message": "Device not found"})
    else:
        if device_info['Items'][0]['is_registered'] == 1:
            return prepare_result(event, "ERROR", 500, {"message": "Device is already registered"})
        if device_info['Items'][0]['is_enabled'] == 0:
            return prepare_result(event, "ERROR", 500, {"message": "Device isn't enabled"})
        if device_info['Items'][0]['device_token'] != device_token:
            return prepare_result(event, "ERROR", 500, {"message": "Device token is not valid"})

    print("Database checks passed for {}, the next is create_keys_and_certificate()".format(device_uid))

    certificate = iot_client.create_keys_and_certificate(setAsActive=True)
    if not certificate:
        return prepare_result(event, "ERROR", 500, {"message": "Unable to create device certificates"})

    print("Database checks passed for {}, the next is attach_policy()".format(device_uid))

    try:
        iot_client.attach_policy(policyName=os.environ['iot_policy_name'], target=certificate['certificateArn'])
    except:
        return prepare_result(event, "ERROR", 500, {"message": "Unable to attach policy to the certificate"})

    try:
        time_registered = datetime.now().isoformat()
        attribute_payload = {
            "attributes": {
                'device_uid': device_uid,
                'registered_via': "iot-core-cvm",
                'registered_on': time_registered
            },
            "merge": True
        }

        thing_name = os.environ['thing_name_format'].replace("%DEVICE_UID%", "{}").format(device_uid)
        thing = iot_client.create_thing(thingName=thing_name, attributePayload=attribute_payload)
    except:
        return prepare_result(event, "ERROR", 500, {"message": "Unable to create thing"})

    try:
        iot_client.attach_thing_principal(principal=certificate['certificateArn'], thingName=thing_name)
    except:
        return prepare_result(event, "ERROR", 500, {"message": "Unable to attach certificate to the device"})


    root_certificate_request = urllib.request.urlopen(os.environ['iot_root_ca_url'])
    if root_certificate_request.getcode() != 200:
        return prepare_result(event, "ERROR", 500, {"message": "Unable to download root CA"})

    root_certificate = root_certificate_request.read()

    try:
        device_info_update = dynamodb_table.update_item(
            Key={"device_uid": device_uid},
            UpdateExpression="set iot_core_thing_name = :t, iot_core_registered_on = :o, is_registered = :r ",
            ExpressionAttributeValues={
                ":t": thing_name,
                ":o": time_registered,
                ":r": 1
            },
            ReturnValues="UPDATED_NEW"
        )
    except ClientError:
        return prepare_result(event, "ERROR", 500, {"message": "Database error during device record update"})

    if 'Attributes' not in device_info_update:
        return prepare_result(event, "ERROR", 500, {"message": "Device info couldnt updated."})

    try:
        iot_core_endpoint = iot_client.describe_endpoint(
            endpointType='iot:Data-ATS'
        )
    except:
        return prepare_result(event, "ERROR", 500, {"message": "Error while getting IoT Core endpoint"})

    if not "endpointAddress" in iot_core_endpoint:
        return prepare_result(event, "ERROR", 500, {"message": "Invalid IoT Core endpoint response"})

    payload = {
        "endpoint": iot_core_endpoint["endpointAddress"],
        "thing_name": thing_name,
        "certificates": {
            "device_certificate": certificate['certificatePem'],
            "root_ca": root_certificate
        },
        "keyPair": {
            "publicKey": certificate['keyPair']['PublicKey'],
            "privateKey": certificate['keyPair']['PrivateKey']
        }
    }

    return prepare_result(event, "SUCCESS", 200, payload)


def prepare_result(event, result_type, status_code=200, payload=None):

    result = {
        'statusCode': status_code,
        'status':result_type
    }

    if payload:
        result["payload"] = payload

    print("Invocation for EVENT='{}', finished with STATUS='{}', STATUS_CODE='{}'".format(
            json.dumps(event),
            result_type,
            status_code)
        )

    return result
Make sure that you've created an IAM role to allow Lambda function accesses to AWS IoT Core and DynamoDB services to run required API calls. You can use the following file as an example policy to be attached to the role. This reference IAM policy will allow Lambda function to perform following restricted IoT and DynamoDB actions.

Device Registration Request
{
    "Version": "2012-10-17",
    "Statement": [
        {
            "Sid": "AllowIoTActions",
            "Effect": "Allow",
            "Action": [
                "iot:CreateKeysAndCertificate",
                "iot:AttachPolicy",
                "iot:CreateThing",
                "iot:AttachThingPrincipal",
                "iot:DescribeEndpoint"
            ],
            "Resource": "*"
        },
        {
            "Sid": "AllowDeviceTableAccess",
            "Effect": "Allow",
            "Action": [
                "dynamodb:Query",
                "dynamodb:UpdateItem"
            ],
            "Resource": [
                "arn:aws:dynamodb:*:*:table/DeviceProvisioningInfoDB"
            ]
        }
    ]
}
This Amazon Lambda function implementation uses the following environment variables to store configurable parameters. After deployment of the Lambda function, navigate to Configuration > Environment Variables to define the following variables.
| Variable | Example Value | Description |
|---|---|---|
| device_dynamodb_table | DeviceProvisioningInfoDB |
Name of the DynamoDB table used as device store. |
| iot_root_ca_url | https://www.amazontrust.com/repository/AmazonRootCA1.pem |
IoT Root CA certificate URL, this certificate will be included in the API response. |
| region | Your Default Region , e.g., eu-west-1 |
Region of DynamoDB and IoT Core resources. |
| thing_name_format | thing_%DEVICE_UID% |
Device name template for AWS IoT Core things, use %DEVICE_UID% variable to build dynamic thing names. |
| iot_policy_name | SingleDevicePolicy |
Default IoT policy to be assigned to devices after registration. |
After deployment of the Lambda function, configure it to be triggered by Amazon API Gateway.
4. Configure API Gateway to trigger Lambda function
Create and configure an AWS API Gateway to make your Lambda function triggered by an HTTP POST call from the device. AWS API Gateway service provides you an API endpoint. The device will use this API endpoint to perform the registration process.
- Navigate to API Gateway console.
- Create an API Gateway REST API (
IoTCVMApi). - Create one resource (
Registration) as endpoint/registration. - Create one method (
POST) for the resource. - Associate the POST method with your Lambda function.
- Deploy the API.
After deployment of the API, copy and save the API invoke URL. This URL is the IoT CVM API endpoint.
Testing and simulation of a device behavior
To test the registration of a device with the UID of DEVICE001, first create the SHA256 hash using following python code on the shell console. Then, copy the calculated hash.
python3 <<< 'import hashlib; print(hashlib.sha256(b"YOUR_SECRET_SALT//DEVICE001").hexdigest())'

$ ecab892722df5937d055dd496cdff41ac6bdece2cfc18b31e896960e52df5787
Navigate to DynamoDB console and add a record to DynamoDB table. The Lambda function will check the device’s identity against the DynamoDB record. You can use the following JSON as a reference:
{
    "device_uid": "DEVICE001",
    "device_token": "ecab892722df5937d055dd496cdff41ac6bdece2cfc18b31e896960e52df5787",
    "is_enabled": "1",
    "is_registered": "0"
}
Use following shell command to perform a device registration API call as acting like your device’s firmware. Replace API_ENDPOINT in the URL with your IoT CVM API endpoint you deployed earlier.
curl -d '{"device_uid":"DEVICE001", "device_token":"ecab892722df5937d055dd496cdff41ac6bdece2cfc18b31e896960e52df5787"}' -H "Content-Type: application/json" -X POST https://API_ENDPOINT/registration

{"statusCode": 200, "status": "SUCCESS", "payload": {...}}
The response indicates that the device has been successfully registered and contains the connection information and certificates. This response is only available once so make sure that you saved the HTTP response. Later requests will responded as device is already registered.
Check the DynamoDB record to see the device’s updated info.
Device is registered to AWS IoT Core using certificate vending machine method. You can navigate to AWS IoT Core Console to see the newly created IoT thing and its attached resources.
Considerations
This implementation covers the basics of an IoT certificate vending machine method. It does not cover certain aspects that may arise in production use.
Security and Authentication
If your IoT devices are exposed to the internet instead of an intranet, your API should be deployed as a public API endpoint. This will allow any internet-connected network to connect your API but also it exposes your API endpoint to possible attacks. To protect your API Gateway endpoint, refer to the Security in Amazon API Gateway documentation to enable features like API rate limiting or IP address-based restrictions with AWS WAF - Web Application Firewall.
This implementation depends on a single unique identifier of a device. If your device’s unique identifiers are sequential or easy to predict, you need to consider your device token calculation formula being reverse-engineered. For this reason, you may need to implement a second unique identifier to mitigate the replay or increment attacks. In this situation, the device should claim its first unique ID, matching second unique ID, and matching calculated hash, for example device_token=SHA256("YOUR_SECRET_SALT//DEVICE_UID_1+DEVICE_UID_2") to be registered.
Your device_token is calculated by hashing functions using your secret salt string. To increase the protection of registration logic and protect the sensitive material, you should implement some extra layers, such as:
- If your device’s computing environment provides hardware-based encryption blocks or read-protected memory blocks, you can leverage these features to reduce the possible attack surface. Otherwise, you may need to include a TPM (Trusted Platform Module) component to your hardware design.
- You can use different secrets salts for different batches or series of devices. This reduces the blast radius if your your secret salt is obtained to a single batch or series of devices.
Service Quotas
This implementation uses an AWS Lambda function to make AWS IoT Core API calls. You need to identify possible batch registration events and estimated throughput of IoT API calls to avoid hitting service limits and quotas.
Logging and Monitoring of Device Registration
Define KPI’s such as “registration success rate” and “registration attempts per device” regarding your device registration use-case. Then, implement a logging and monitoring mechanism for critical steps to build a registration dashboard. This monitoring strategy can include the following:
- CloudWatch log insights of the CVM Lambda function
- Lambda function invocation metrics
- IoT Service CloudWatch metrics
- IoT Core service logs
- IoT Core service events
API Response Times, Errors, and Retries
Your IoT device’s registration implementation should be aware of the CVM API response times and possible error codes. In case of an error, it should trigger retries or reporting scenarios within a well-defined flow.
CVM API response time depends on possible Lambda cold starts, IoT Core API calls run in the Lambda function, and your other custom logic in the function.
In the Lambda code above, some possible application-level error catches (try/except) are implemented as examples. Ensure your application code can handle all potential error conditions and always respond with a descriptive error message.
Multi-Region Strategy
This implementation shows how to provision IoT resources in a single region. Also, the device database in Amazon DynamoDB and Amazon API Gateway endpoint are deployed in a single region. If your use-case requires the creation of IoT resources in different regions, you can implement additional logic in the Lambda function and call APIs in different regions to create resources. If your use-case requires complete isolation of resources in different regions, or a multi-region fault tolerance, you can deploy the CVM solution to multiple regions. You can leverage multi-region features of services used, e.g. global tables feature of Amazon DynamoDB, which provides fully managed, multi-region, and multi-active database, that replicates automatically across your choice of AWS Regions.